
Chicken Biryani Recipe: 4 Easy Steps For Foolproof Rice
Last updated on October 23rd, 2026
Most chicken biryani recipes tell you to use the standard rice-to-water ratio and hope for the best. This one doesn’t: the rice gets deliberately under-hydrated, then finishes cooking in the steam trapped under the lid alongside the chicken, so it never turns mushy by the time everything’s ready together. If you want a simpler everyday rice with a similar toasted spice note, try the one-spice jeera rice from my meal prep recipe.
The depth of flavour comes from a proper spice base: cumin, chilli, coriander, garam masala, garlic and ginger, worked in through a long marinade and a careful tempering, not just stirred in at the end. It’s the same two-stage marinade logic I use for oven-roasted chicken tikka skewers.
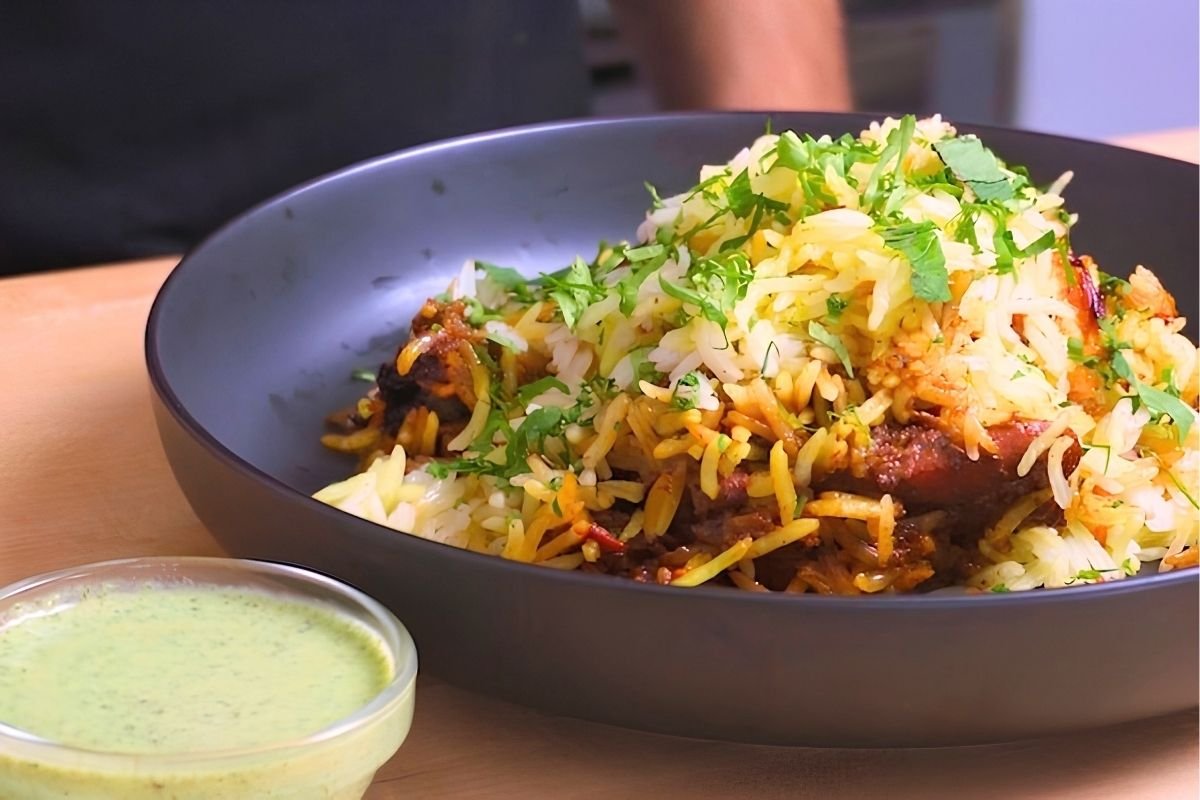
The Mughal Technique Behind Every Great Biryani
Biryani dates back to the kitchens of the Mughal Empire, and the technique that made it famous is the one this recipe still relies on: partially cooking the rice and the meat separately, then layering and finishing them together so the flavours combine without either one turning to mush. Every regional version handles the details differently, but that basic layering method is what all of them have in common.
It’s the kind of dish that gets made for a reason, whether that’s a gathering, a celebration or a Sunday with time to spare, because it does take patience: a long marinade, a careful layering, and a slow finish. Serve it with a cooling raita on the side to balance the warmth of the spices, and you’ve got a dish built for sharing. My quick herby raita takes five minutes and is the perfect partner.
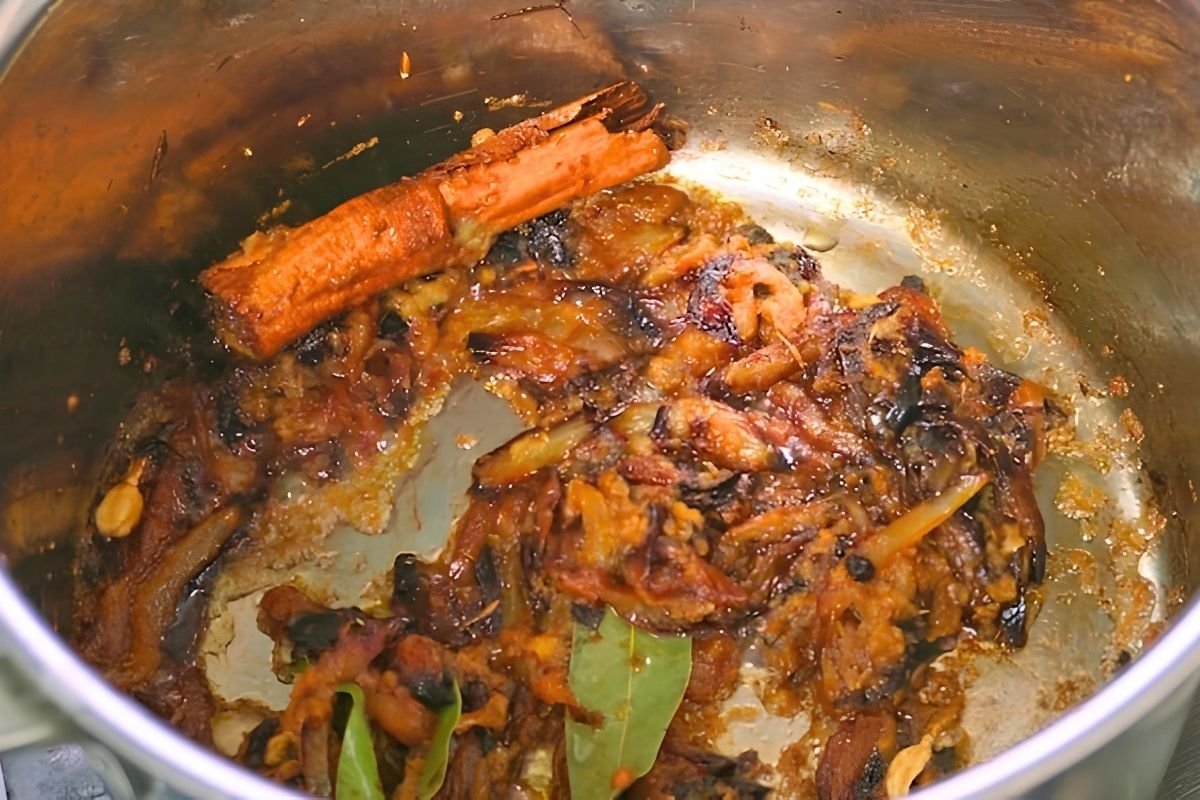
A few details make the biggest difference here. When you’re tempering the spices, keep the heat moderate: if things start catching on the base of the pan, a splash of water cools it down without stopping the cooking. For the rice, forget the usual 1.5-times-water ratio: this recipe uses only two-thirds of that, so the rice stays underdone at this stage and finishes properly once it’s steaming under the lid with the chicken. Make your own garam masala if you can: it only takes a few minutes and tastes noticeably fresher than a shop-bought jar. My five-minute garam masala recipe is exactly the blend I use here. Marinate the chicken for ideally 12 hours so the spices actually penetrate the meat (even 5 or 10 minutes still makes a difference), and use bone-in thighs or drumsticks: the bone keeps the meat moist through the long cook. If you’re buying a whole bird, breaking down a chicken yourself gets you the thighs and drumsticks for a fraction of the price.
How to Make Chicken Biryani Step by Step
Biryani looks like a big job, but it breaks down into four easy steps: marinate, cook the chicken, part-cook the rice and steam it all together. Here are the parts that decide whether it works. The full quantities are in the recipe card below.
Marinate the chicken
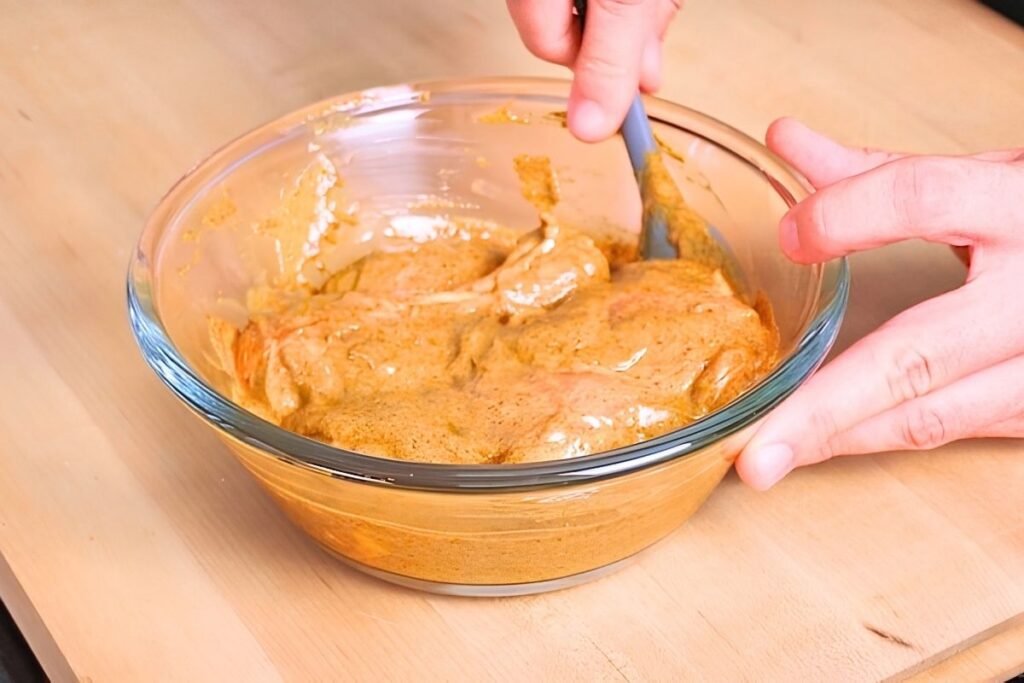
Mix natural yoghurt, a splash of oil, garam masala, ground coriander, cumin, chilli powder, turmeric, nutmeg, a small pinch of sugar and salt. Coat the bone-in, skinless thighs and drumsticks and refrigerate, ideally for 12 hours. If you haven’t got 12 hours, even 5 or 10 minutes in the marinade still makes a difference.
Build the base and cook the chicken
Cook one sliced white onion with a light pinch of salt over a medium to high heat, stirring regularly. Mine took 20 minutes. Don’t skimp on this step: it’s the foundation of the flavour. Lower the heat, deglaze with a dash of water, then add the whole spices, garlic and ginger. You want them sizzling but not catching on the base of the pan, so add another dash of water if they start to stick.
Add the chicken with all of the marinade and cook over a low heat until you see a change in colour, around 3 to 5 minutes. Add enough water to cover the chicken by about half, along with the green chilli, tomato and prunes, then simmer gently with the lid on for 30 minutes. If the sauce still looks watery at the end, simmer it for a few minutes with the lid off.
Part-cook the rice
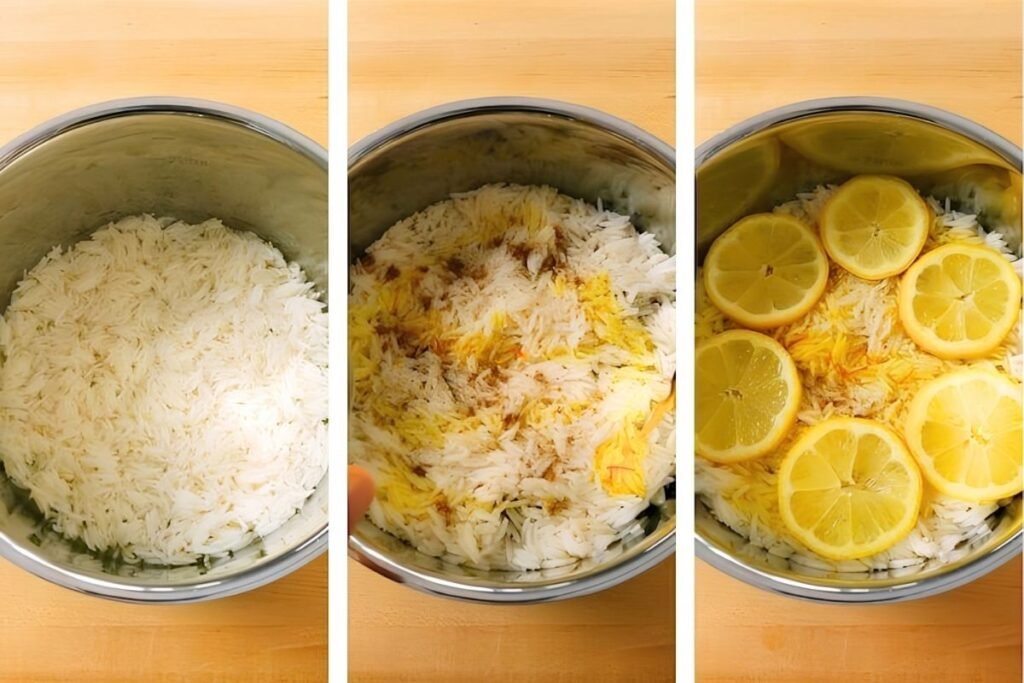
Wash the basmati until the water runs almost clear, then soak it for 30 minutes. Drain it and cook it with the same volume of water as rice, a pinch of salt, a splash of oil and a squeeze of lemon, lid on, for around 5 minutes until all the water has been absorbed. Spread it out on a plate or tray to stop it cooking. At this point the rice is only half cooked, which is exactly where you want it. With less water it can only absorb so much and only cook so far, which makes this almost foolproof. I use the same soak and steam thinking for short grain rice in my Japanese rice ball recipe, just with a different water ratio.
How to Layer Biryani
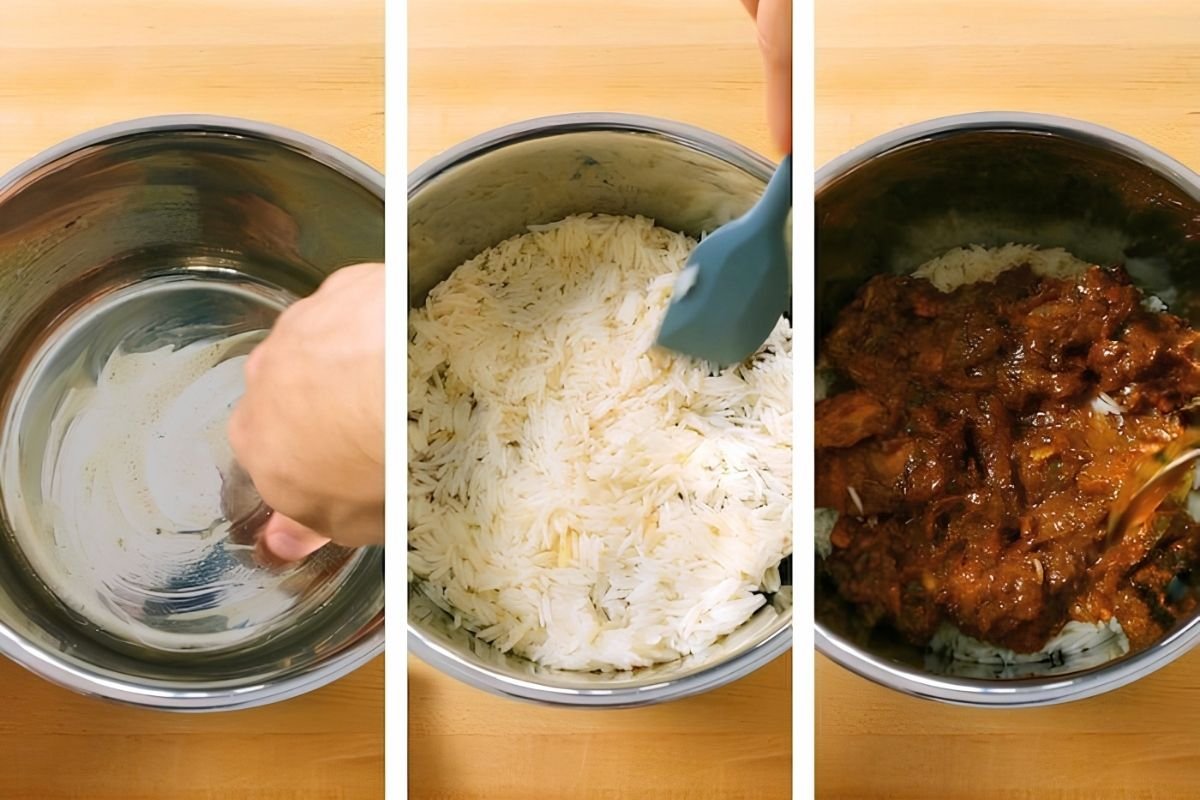
Use a medium to large pot, ideally a wide one, and rub a little ghee or oil over the base and sides. Spread in half the rice, add a light dusting of garam masala (around half a teaspoon), then all of the chicken and sauce. Top with the rest of the rice and another half teaspoon of garam masala. If you like, drizzle over a pinch of saffron soaked in a shot of warm water for 5 minutes, and finish with a few lemon slices.
Steam it (dum)
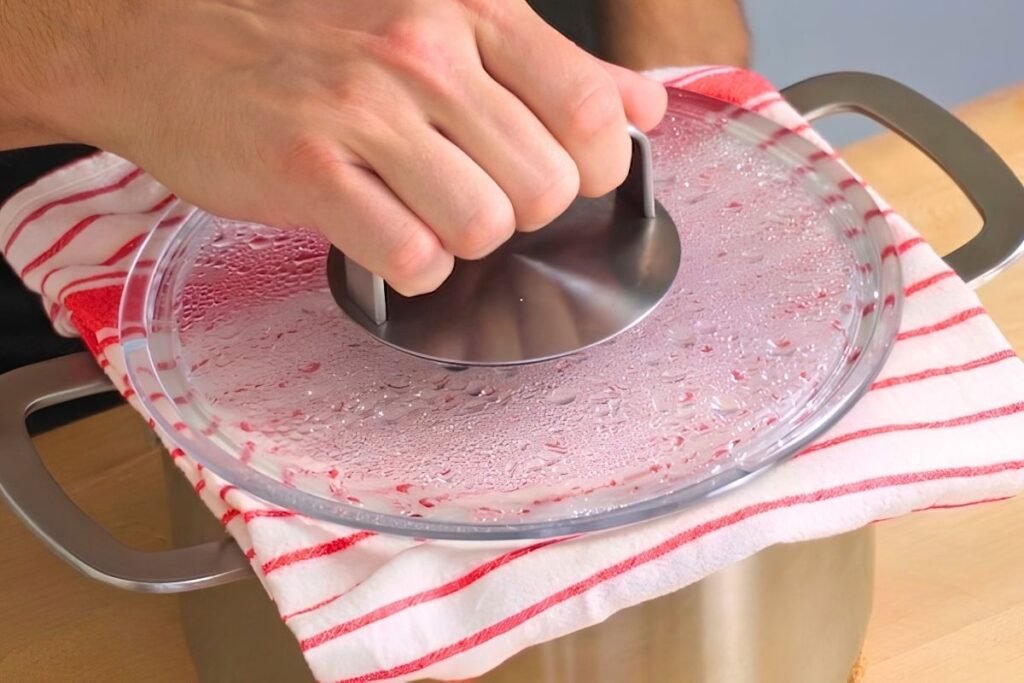
Put the lid on with a towel or some foil in between to seal in the steam. Cook on a medium heat for 5 minutes, until you see condensation forming on the lid, then turn it to low for 20 minutes. If it sounds or feels like it’s cooking too aggressively, use a heat diffuser, a cast iron pan or a griddle to spread the heat more evenly. Finally, turn the heat off and leave it with the lid on for another 15 minutes. That last stage really brings the flavours together.
Tips & Tricks
- Serve your biryani with a cooling raita to the side.
- When tempering (cooking / frying) spices, keep the heat on medium. If you feel things are going too fast or catching on the base of the pan too much, then add a splash of water.
- For basmati rice, the usual ratio is 1.5 times the water, but this recipe is different. The idea is to only give the rice two-thirds of the water it needs so it can only cook so far.
- Make your own Garam Masala spice blend, it’s super easy
- Marinate the chicken for 12 hours if possible, the flavours really develop.
- Use bone-in thighs and/or drumsticks for this recipe for the best results.
Frequently Asked Questions
How long should I marinate the chicken?
Ideally 12 hours. The extra time lets the spices really develop and penetrate the meat for a much deeper flavour by the time it’s cooked. If you haven’t got 12 hours, even 5 or 10 minutes in the marinade still makes a difference.
Why only use 2/3 of the usual water for the rice?
Giving the rice less water than the standard 1.5x ratio means it can only cook so far on its own, which stops it turning mushy once it’s layered and steamed together with the chicken.
Can I make my own garam masala?
Yes, it’s simple to make and is recommended over a shop-bought blend, since a freshly made batch gives a noticeably fresher, more fragrant flavour.
Should I use bone-in or boneless chicken?
Bone-in thighs and/or drumsticks give the best results for this recipe. The bone helps keep the meat moist and flavourful through the long cook.
What should I serve with biryani?
A cooling raita on the side is the classic pairing. It balances out the warmth of the spices and adds a fresh, creamy contrast.
How long does chicken biryani take to cook?
From start to finish it takes about 1 hour 45 minutes, plus marinating time, ideally 12 hours. The onions take around 20 minutes, the chicken simmers for 30, the rice needs just 5, and the biryani then steams for 20 minutes and rests for 15.

Chicken Biryani Recipe: 4 Easy Steps, Foolproof Rice
Equipment
- Food processor
- Mixing bowl / Bowl
- Strainer / Sieve
- Chef’s knife
- Chopping board
- Microplane / Fine grater
- Digital scales
- Measuring jug
- Measuring spoons
- Shot glass / Measure
- Frying pan
- Large pot / Stockpot
- Saucepan
- Plate / Tray
- Serving plate / Platter
- Lid
- Spoon (table, dessert, tea)
- Wooden / Stirring spoon
Ingredients
- 500 g 4 x bone-in, skinless chicken thighs and/or drumsticks
- CHICKEN MARINADE
- 1/2 cup 100g natural yoghurt
- 1/2 tbsp neutral oil
- 4 tsp / 8g garam masala
- 1 tsp / 2g ground coriander
- 1/2 tsp / 1g ground cumin
- 1/2 tsp / 1g red chilli powder
- 1/4 tsp ground turmeric
- 1/4 tsp nutmeg powder
- Small pinch of sugar
- 1.5 tsp / 3g salt
- RICE
- 1 1/4 cups / 250g basmati rice
- Light pinch of salt 1/2 teaspoon
- 1 tbsp oil
- Light squeeze lemon juice 1/2 tablespoon
- BIRYANI / SAUCE
- 1 tablespoon neutral-tasting oil
- 1 tablespoon of ghee or use butter
- 1 x 250g medium-sized onion
- 5 garlic cloves
- 1 x small piece of ginger
- 1 x tomato
- 2 x green chillies
- 4 x prunes / dried plums
- 0.22 to 0.5 tsp salt
- 1 tsp / 2g garam masala
- A little squeeze of lemon juice
- WHOLE SPICES
- 2 x bay leaves
- 4 x whole cloves
- 4 x star anise
- 8 x cardamom pods
- 1 x 8cm / 3-inch cinnamon stick
- 1/2 tsp / 1g cumin seeds
- 1/2 tsp whole black peppercorns
- LAYERING / TOPPING
- 1 tsp garam masala
- 1 tbsp oil
- Handful of coriander leaves
- Half a handful of mint leaves
- Shot of saffron water optional
Instructions
- MARINADE
- Into a bowl, add natural yoghurt, a splash of neutral-tasting oil.
- Add garam masala powder. If you can't find this spice blend, you can make it yourself using the following recipe.
- Add ground coriander, ground cumin, chilli powder, ground turmeric, ground nutmeg, a little pinch of sugar and salt.
- Mix all the marinade ingredients together in the bowl until well combined.
- Add bone-in, skinless thighs and drumsticks to the bowl.
- Give the chicken pieces a good mix, ensuring they are evenly coated with the marinade.
- Ideally, refrigerate the chicken for 12 hours to allow the flavours to develop.
- Note: If you don't have 12 hours to spare, you can still marinate the chicken for a shorter time, such as 5 or 10 minutes. Even a shorter marination period will make a difference in flavour.
- CHICKEN
- Heat a medium or large heavy-bottomed pot over high heat, add a splash of neutral-tasting oil and the same amount of ghee to the pot.
- Add 1 medium white onion, sliced to the pot, along with a light pinch of salt. Cook the onions on medium to high heat, stirring regularly, until they are caramelized.
- Lower the heat and add a dash of water to deglaze the pan, scraping up any browned bits from the bottom.
- Once the water is close to drying up, add the following spices: 2 bay leaves, 4 whole cloves, 8 whole cardamoms, 4 star anise, a small cinnamon stick, half a teaspoon of cumin seeds, half a teaspoon of black peppercorns.
- Add 5 cloves of garlic (pureed, grated, minced, or crushed) and a piece of ginger (finely grated or pureed, around the size of the end of your thumb).
- Add the chicken along with all the marinade to the pot.
- Cook the chicken and marinade over low heat for about 3 to 5 minutes, until you see a change in colour.
- Add enough water to cover the chicken by about half. Then add 1 sliced green chilli, adjust the quantity based on your taste preference, one roughly diced tomato and 4 prunes or dried plums (cut in half).
- Stir everything into the sauce, keeping the heat on low.
- Bring the pot to a gentle simmer and place a lid on top.
- Cook for 30 minutes, occasionally stirring and checking that nothing is catching on the bottom of the pan.
- RICE
- Wash the rice thoroughly until the water runs almost clear.
- Leave the washed rice to soak, just covered in water, ideally for 30 minutes.
- In a medium-sized saucepan, add water at the same weight or volume as your rice.
- Add a light pinch of salt, around a tablespoon of oil, and a little squeeze of lemon juice to the water in the saucepan.
- After the rice has soaked for 30 minutes, drain it well and add it to the saucepan.
- Place a lid on the saucepan and bring it to a boil over medium to high heat.
- Once the water is boiling, lower the heat to bring the pan to a gentle simmer.
- Continue to cook the rice for around 5 minutes until all the water has been absorbed.
- Spread the partially cooked rice out on a plate or tray to prevent it from cooking further.
- Note: At this stage, the rice is only half cooked, which is ideal for a biryani. There will be a final stage of cooking later. The purpose of cooking the rice in less water is to control its absorption and ensure it only cooks to a certain extent, making it foolproof!
- ASSEMBLING AND STEAMING – “DUM”
- Prepare a medium to large pot, preferably wide. Rub a little ghee over the base and sides of the pot.
- Spread half of the partially cooked rice evenly over the base of the pot.
- Lightly sprinkle around half a teaspoon of garam masala over the rice.
- Add all of the cooked chicken and its sauce onto the rice layer.
- Spread the remaining half of the partially cooked rice on top of the chicken layer.
- Sprinkle another half teaspoon of garam masala over the rice.
- Optionally, soak a pinch of saffron in a shot of warm water for 5 minutes and drizzle it over the rice for added colour and flavour.
- Place some lemon slices on top of the rice for freshness.
- Cover the pot with a lid, and if possible, place a towel or foil in between to create a tighter seal and retain steam.
- Put the pot on medium heat for 5 minutes or until steam starts forming on the lid.
- Reduce the heat to low and continue cooking for 20 minutes.
- Note: If it seems that the dish is cooking too aggressively, use a heat diffuser, cast iron pan, or griddle to disperse the heat evenly.
- After the gentle steaming period of 20 minutes, turn off the heat and leave the pot with the lid on for another 15 minutes.
- Note: This resting period allows the flavours to meld and the rice to fully absorb the flavours.
- This crucial step completes the authentic biryani cooking method known as "dum."
Video
Nutrition
Nutrition Facts
| Total Fat | 42.9g |
| Saturated Fat | 9.5g |
| Cholesterol | 210mg |
| Sodium | 1178mg |
| Total Carbohydrate | 140.7g |
| Dietary Fiber | 10.1g |
| Sugars | 18.1g |
| Protein | 53.5g |
| Potassium | 1431mg |





This is so simple and delicious. Wonderful !